Creating WordPress themes can be really simple if you know basic HTML, CSS, and JavaScript. Getting started with theme development can seem overwhelming, especially for a beginner.
What are the Requirements to Create a WordPress Theme?
You can also get WordPress from the official website, but you’ll need to change the database credentials first. You don’t need to know any PHP or have any prior WordPress knowledge. But a development environment with Apache, PHP, MySQL, and WordPress installed is required to design a WordPress theme.
In its simplest form, a WordPress theme is a regular HTML page that is made up of the following files:
- header.php – contains the code for the header section of the theme.
- index.php – contains the code for the Main Area and will specify where the other files will be included. This is the main file of the theme.
- sidebar.php – contains the information about the sidebar.
- footer.php – handles the footer section.
- style.css – responsible for the styling of your theme.
- single.php – includes code for displaying the article on its own page;
- page.php – includes code for displaying a single page’s content;
- archive.php – displays a list of items in the archive, as well as the categories that the user has defined;
- functions.php – This file contains functions that enhance theme functionality, such as logos, menus, color, thumbnails, scripts, and stylesheets.
- 404.php – an error code indicating that the requested file could not be found.
Now let’s move on to the steps for creating a WordPress theme.
Step 1: Make a folder to hold the files you’ll be adding
Anyhow, we need to know where the files that make up a WordPress theme sit in a WordPress installation if we’re going to construct themes. A WordPress installation usually contains a WordPress directory as its root directory.
Files:
- index.php
- license.txt
- readme.html
- wp-activate.php
- wp-blog-header.php
- wp-comments-post.php
- wp-config.php
- wp-config-sample.php
- wp-cron.php
- wp-links-opml.php
- wp-load.php
- wp-login.php
- wp-mail.php
- wp-settings.php
- wp-signup.php
- wp-trackback.php
- xmlrpc.php
Folders
- wp-admin
- wp-content
- wp-includes
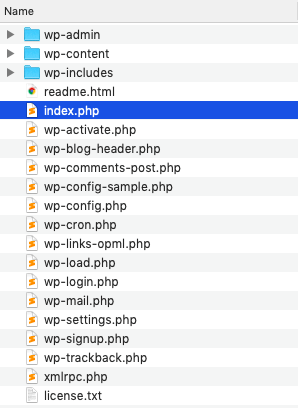
In Finder, follow the path of wp-content > themes to arrive at your themes folder.
Step 2: Create the Custom Theme
A WordPress theme needs only two files to exist – style.css and index.php. It is required in all themes and contains the information header for your theme. Change the name, author, description, and so on. Let’s take a look at what each of them indicates.
Theme Name – A theme name should always be provided. If you don’t, the folder name will be used.
Theme URI – it should direct users to a website where they may learn more about the theme.
Author – This is where you put your name.
Author URI – Here you may add a link to your personal or business website.
Description – is displayed in both the wp-admin theme modal and the WordPress theme listing.
Version – Version numbers help developers keep track of changes and ensure that customers use the most up-to-date version.
License – You may choose how your theme is licensed, but if it isn’t GPL-compatible, you won’t be able to distribute it on WordPress.
style.css
/*
Theme Name: New theme
Author: InCreativeWeb
Author URI: /
Description: My custom theme
Version: 1.0
Tested upto: 5.4
*/
Coming to index.php WP loads the posts that would be shown on the screen using this file. It is the main template file and is required in all themes. In addition, if a WP base file is missing, wp will use it.
Go to the WordPress dashboard, and click on Appearance > Themes. You’ll see the theme in the collection with all the default themes.
Step 3: Activate the Theme
As mentioned above, go to the WordPress Dashboard, choose “Appearance,” then “Themes,” and see if the newly built theme is listed there. To check if the information entered in the style is correct, go to “Theme Details.”
With this, you’ve technically created a custom theme already. Of course, it doesn’t do anything yet beyond what a static HTML site can do, but you’re all set up now.
Step 4: Change the Settings in the index.php file
To test if your theme works, go back to the index.php and write a command-line for WP to retrieve from the database the posts and show them on the page.
The page will be updated if there are any new listings. If not, the message for the negative response condition that we set in the code will be shown (false). WordPress looks for new entries in this loop and shows them on the page as needed.
index.php
<?php get_header(); ?>
<div id="main" class="row">
<div id="content" class="col-lg-8 col-sm-8 col-md-8 col-xs-12">

<div class="row">
<?php if (have_posts()) : while (have_posts()) : the_post(); ?>
<div class="col-lg-6 col-sm-6 col-md-6 col-xs-12">
<h1><?php the_title(); ?></h1>
<h4>Posted on <?php the_time('F jS, Y') ?></h4>
<p><?php the_content(__('(more...)')); ?></p>
</div>
<?php endwhile; else: ?>
<p><?php _e('Sorry, no posts matched your criteria.'); ?></p>
<?php endif; ?>
</div>
</div>
<?php get_sidebar(); ?>
</div>

<?php get_footer(); ?>
The “the post” method fetches the most recent post and makes the required adjustments to show it chronologically on the theme page. The content is attached to the file title put on the page using the “the content” function. The “the permalink” function creates a link to each individual post.
As a result, when the user clicks on the link, they only get the whole text.
Step 5: Dividing Your Page into Sections
we want the header, footer and sidebar on all the pages to be the same. So, we’re going to divide index.php into two sections – header.php and footer.php.
It should be entered before the closing /head> tag to make it smoother to add plugins to the site, since this hook may be used to integrate styles, scripts, or meta components to the head> region.
Whereas, the footer.php file can close the tags used in the functions, as defined below:
header.php
<html>
<head>
<title>Tutorial theme</title>
<script type="text/javascript" src="<?php echo get_stylesheet_directory_uri().'/js/jquery.js'; ?>">
</script>
<script type="text/javascript" src="<?php echo get_stylesheet_directory_uri().'/js/jquery-ui.min.js'; ?>">
</script>
<script type="text/javascript" src="<?php echo get_stylesheet_directory_uri().'/js/bootstrap.js'; ?>">
</script>
<link rel="stylesheet" href="<?php echo get_stylesheet_directory_uri().'/css/bootstrap.css'; ?>">
<link rel="stylesheet" href="<?php bloginfo('stylesheet_url'); ?>">
</head>

<body>

<div id="header" class="jumbotron">
<h1>HEADER</h1>
</div>
<div class="container">
footer.php
<div id= "footer">
<h1>FOOTER</h1>
</div>
</div>
</body>
</html>
If you want them, you need to again divide the index.php into sidebar.php, content.php, etc. If the sidebar is where all the secondary information goes, the content is where all the articles and main content of the website go.
Step 6: Create the functions.php file
Your custom theme contains index.php, style.css, header.php, and footer.php files. The next file you should have is functions.php, which gives WordPress personality by allowing the command-line to change the CMS’s default behaviour.
Reference By:
- https://themeisle.com/
- https://wp.technology/
Author
Jayesh Patel
Jayesh Patel is a Professional Web Developer & Designer and the Founder of InCreativeWeb.
As a highly Creative Web/Graphic/UI Designer - Front End / PHP / WordPress / Shopify Developer, with 14+ years of experience, he also provide complete solution from SEO to Digital Marketing. The passion he has for his work, his dedication, and ability to make quick, decisive decisions set him apart from the rest.
His first priority is to create a website with Complete SEO + Speed Up + WordPress Security Code of standards.