The hosts file on your Mac is significant for several reasons. But, if you wish to change your Internet Protocol (IP) address and override your Domain Name System (DNS), this is especially important. It is imperative to identify and retrieve this file in that case.
The good news is that it can be done quite quickly and without much discomfort. All you have to do is know which program to open and what commands to type. After that, you can safely update and modify your hosts file on your Mac device to resolve domain names to IP addresses.
This article describes the function of the Mac hosts file. The next four easy steps show you where to find and change it.
What is the Mac hosts file and why is it significant?
The DNS in the nameservers to which your domain is pointed usually directs users to your website. Your URL is converted into an IP address that the server can understand by the DNS.
Nonetheless, the hosts file on your computer-a Mac, in this case-allows you to resolve your website to a distinct IP address. Stated otherwise, it is possible to manually set your domain name to the IP address of your preference.
One reason you might want to make changes to your hosts file is if you’re moving your website to a different server.
You can test your website on a different server by manually updating your hosts file to resolve the IP address and domain name. Even in cases when the DNS hasn’t yet spread, this regulation is still in effect.
In short, you can replicate and test everything using your Mac hosts file. Therefore, before you finish the migration process, you can make sure that everything appears to be functioning as it should.
How to locate and modify the hosts file on your Mac?
It is now time to work with your newfound knowledge of the Mac hosts file. These are four simple actions that will help you identify and edit this file.
- Open your terminal application
- Access your /etc/hosts folder
- Begin editing your Mac hosts file
- Flush your DNS cache
1. Open your terminal application
Accessing and using your Terminal program is the first step towards getting started. Also take note that to accomplish this, you’ll need root user access. In the event that you lack these rights, you can activate the root user account by logging in with an administrator account.
Finder > Go > Utilities is where you can find the Terminal application.
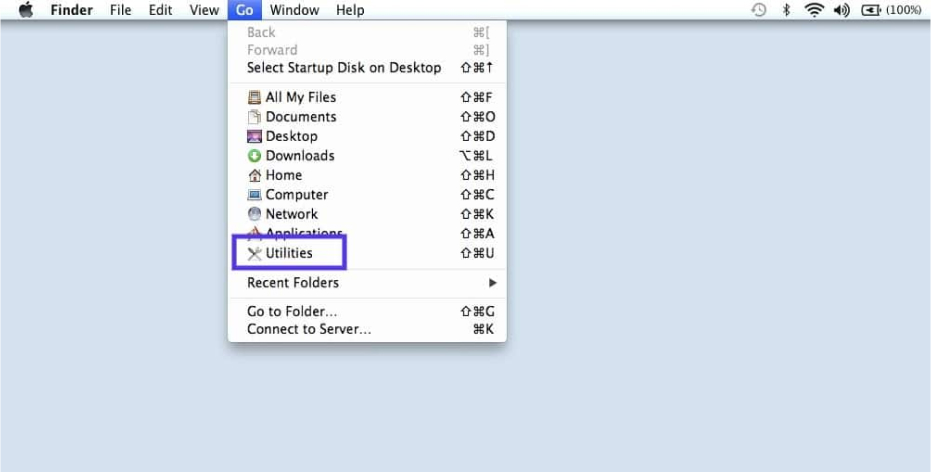
– Find the Terminal application on your Mac
You can control your Mac device with a variety of tools that appear when you do this. The terminal program will then be clicked.
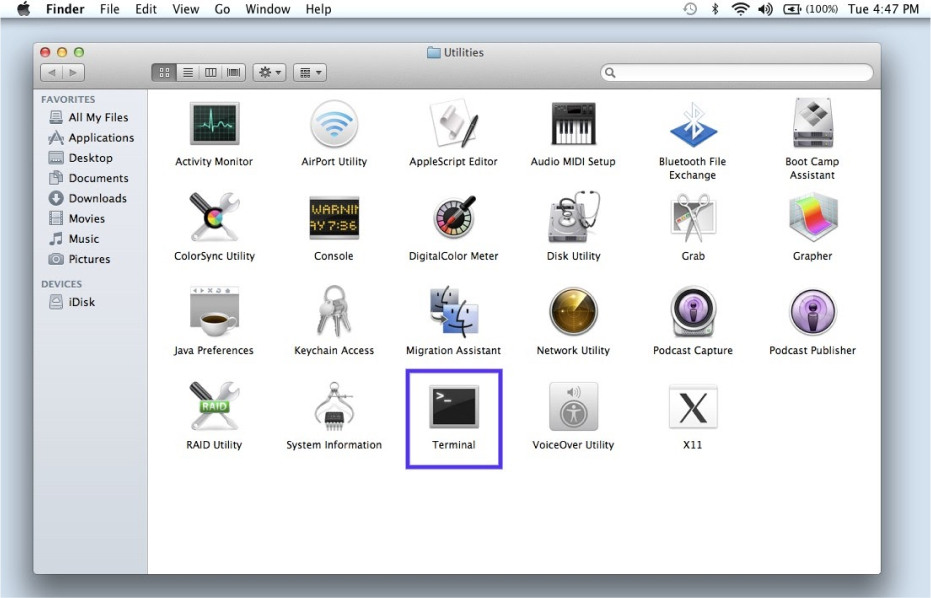
– Select the “Terminal” application
Hitting F4 will also fire the launcher as an alternative. The Terminal icon will then show; choose it by typing “terminal” into the search area.
2. Access your /etc/hosts folder
After launching the terminal application, the hosts file can be located in the /etc/hosts directory. To access and edit it, you’ll need a text editor. For this tutorial, we’ll use the Nano text editor since it’s both versatile and easy to use.
Info
On a Mac, the primary hosts file is stored at /private/etc/hosts, while /etc/hosts serves as a symbolic link pointing to the same file. This means either path can be used to access and update the file, with all modifications taking effect.
However, in older macOS versions like macOS 14.7 or earlier, changes to /etc/hosts might not work. In these cases, directly editing the file at /private/etc/hosts is recommended to ensure changes are successfully applied.
Installing the most recent Nano software version is the first step. Next, you can use the Terminal application to enter the following command.
sudo nano /etc/hosts
Then hit the Enter or Return key. After that, you’ll be prompted to enter your administrator password:
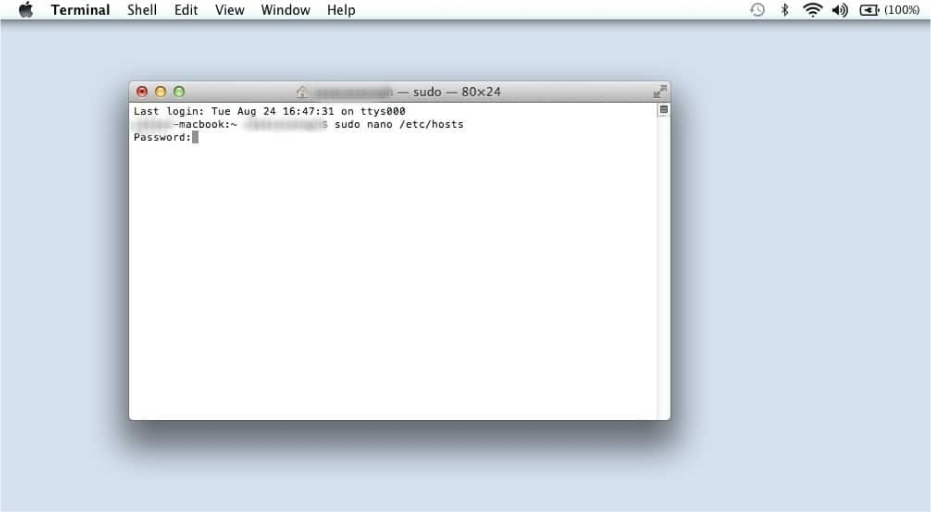
– Enter the “sudo nano /etc/hosts” command
After entering your password, press the Enter or Return key one more.
Important
Note that when you enter your password, it won’t populate on the screen for security purposes.
3. Begin editing your Mac hosts file
The Nano text editor will open when you enter your password and press Enter or Return. This is how your screen should currently appear.
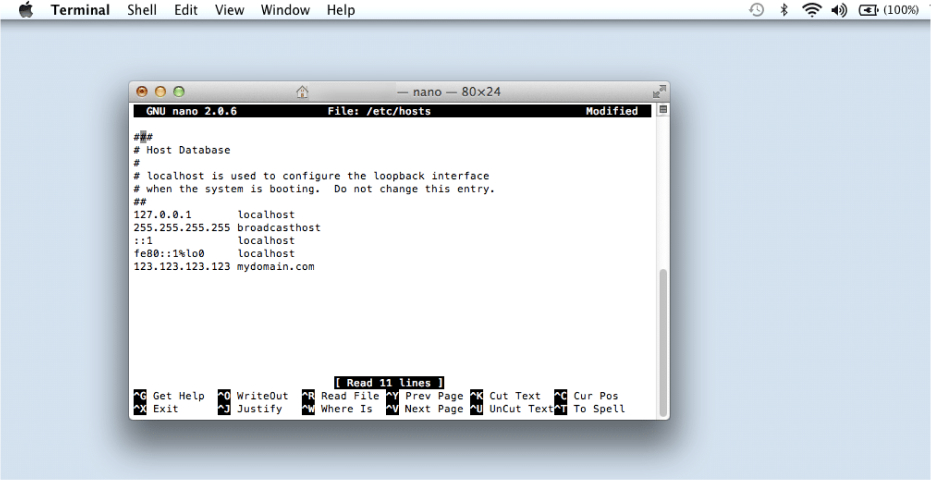
– Nano Text Editor
The actions that follow will vary depending on what you want to accomplish with the hosts file. Let’s say, though, that you’re attempting to add a new domain.
To get to the bottom of the file, use your arrow keys. Next, you can add the IP address of the desired domain on a new line:

– Add the domain ip address
The screenshot above shows that we have put “123.123.123.123” as our new domain. This and “mydomain.com” should be changed to anything you’re attempting to add.
Remember that each entry you add needs to be on its own line. Multiple entries, for instance, should have the following format:
SERVER_IP_ADDRESS domain.com
SERVER_IP_ADDRESS www.domain.com
You can use your keyboard to remove the line or lines you’ve added if you want to undo the modifications you’ve made. At the bottom of the editor window is a list of keys.
If you want to stop your device from pointing a website in their direction, you can block IP addresses in addition to adding them. You can use “127.0.0.1” for it.
When you’re finished, use Enter or Return to replace the current file, then Ctrl + O. Ctrl + X can be used to exit.
4. Flush your DNS cache
Your DNS cache can be the issue if you’ve made changes to your Mac hosts file but they aren’t taking effect. Consequently, after you have finished modifying the file, it is not a terrible idea to clear your cache.
Saved IP records are deleted when you flush your cache. Your browser will be able to display the updated IP address from the changed hosts file as a result of this procedure.
You can use the Terminal application to type the following command to update the DNS records in your browser:
sudo killall -HUP mDNSResponder
By doing this step, you may be sure that your modifications are applied instantly in your browser. Now that your Mac hosts file has been successfully modified, congratulations!
Conclusion
Moving your website to a new server can be a significant undertaking. But before you finish the migration process, there can be times when you want to replicate and test the website on your new server. If that’s the case, you can access the hosts file on your Mac.
You may locate and modify your Mac hosts file by following these four easy steps, as we covered in this post:
- On your Mac computer, launch the Terminal program.
- You can use a text editor like Nano to access your
/etc/hosts folder.
- In order to add the new IP addresses and domain names, start updating your hosts file.
- For your browser to take effect of the changes, flush your DNS cache.
The act of manually modifying your Mac hosts file has numerous benefits.
Need help with editing your Mac hosts file? Let InCreativeWeb assist you in updating your DNS settings and optimizing your website performance. From step-by-step guidance to expert support, we can help you modify your DNS settings, enhance testing environments, and streamline website migrations. Contact us today to learn more!
Author
Jayesh Patel
Jayesh Patel is a Professional Web Developer & Designer and the Founder of InCreativeWeb.
As a highly Creative Web/Graphic/UI Designer - Front End / PHP / WordPress / Shopify Developer, with 14+ years of experience, he also provide complete solution from SEO to Digital Marketing. The passion he has for his work, his dedication, and ability to make quick, decisive decisions set him apart from the rest.
His first priority is to create a website with Complete SEO + Speed Up + WordPress Security Code of standards.