You can host a static website straight from a Git repository with Github Pages, which is a useful feature. It’s a great way for independent developers to promote open-source projects, display their portfolios, and share details about organizations or educational institutions.
Many well-known projects, such as Bootstrap, NormalizeCSS, and Yelp, use Github Pages for hosting.
This guide will show you how to use Github Pages to build and publish a simple website. You are presumed to be familiar with the fundamentals of Git and its commands, including how to generate and push commits to a remote repository.
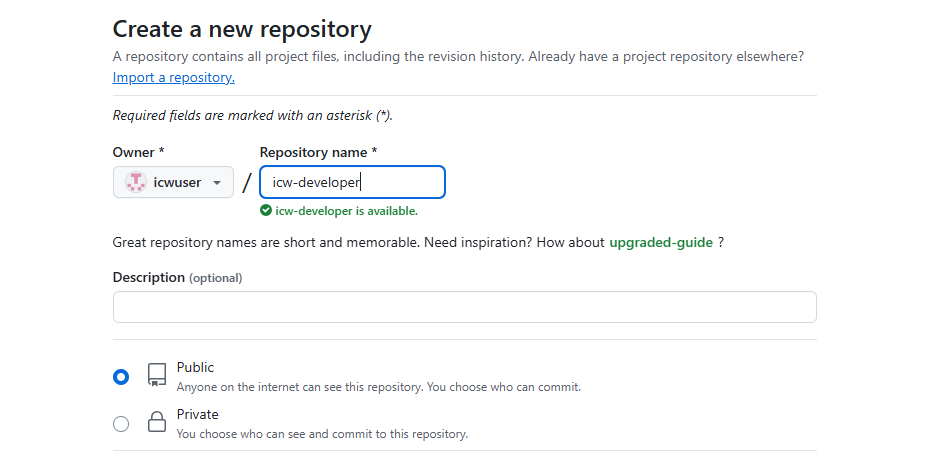
Step 1: Make a repository
To create a repository, you must first have a Github account. There are no restrictions on the repository’s name; you are free to choose whatever you like.

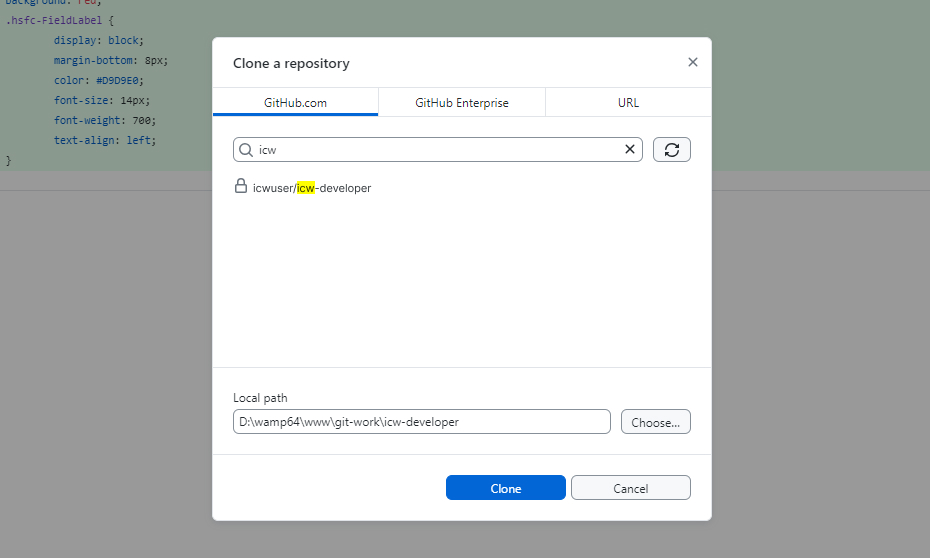
Cloning the repository to your local computer comes next after it has been created. You may quickly do this by selecting File > Clone Repository in the Github Desktop program, if you have it installed.

As an alternative, you can use the git command-line interface (CLI) to clone the repository, as seen here:
git clone https://github.com/icwuser/icw-developer.git
Step 2: Make the home page.
Github mostly searches for a file called index.html in order to set up a homepage. It can also make use of README.md or index.md. To keep your site separate from the main source code, you can put this file at the root of your repository or inside a subfolder, usually in the docs or site directory.
I’ll show how to add an index.html file to the docs directory in this example, along with some Bootstrap styles and scripts.
We may now add and push the files to the Github repository since they are ready.
Step 3: Set up the deployment of pages
Select Settings > Pages from within your Github repository. To deploy the source as Github Pages, choose it here. Select the relevant branch and set the directory to /docs under the “Build and deployment” box, as we have the index.html page in the docs directory.
With that, your Github Pages site is fully configured. Github will supply a pattern for the URL that will be used to access the website. The site for your Github Pages will be icwuser.github.io/icw-developer, for instance, if your repository is located at github.com/icwuser/icw-developer.
Benefit: Making Use of a Custom Domain
Your Github Pages website will have a unique URL that is simpler to remember and improves the branding of your website if you use a custom domain. Here’s how to configure it.
Step 1: Include a DNS record
Add a DNS record to connect your custom domain to Github Pages first. To use icw-developer.icwuser.net, for example, you must add a CNAME record pointing to icwuser.github.io in your domain’s DNS management.
Please ask your domain registrar for help if you’re not sure how to add a new DNS entry or where to find your DNS manager.
Step 2: Await the propagation of the domain.
It can take anywhere from a few minutes to a full day for the modifications to take effect after the DNS record has been set. DNS propagation tools such as WhatsMyDNS or the following command can be used for monitoring:
dig icw-developer.github.io +nostats +nocomments +nocmd
Step 3: Include a domain in the repository.
Once DNS propagation is finished, notify Github about your unique domain. Navigate to the Pages section of your repository’s Settings, then fill in the Custom Domain form with your custom domain. Github will configure and validate the domain. You can further secure your website by turning on the "Enforce HTTPS" option after it has been confirmed.
Wrapping Up
With Github Pages, publishing a website becomes incredibly simple. Whether you’re showcasing open-source projects, portfolios, or corporate information, following these three steps allows you to host a professional-looking site in no time. Adding a custom domain enhances your website’s branding and accessibility. Get started today and bring your ideas to life on the web! Reach out to us at InCreativeWeb if you have any questions or need assistance with setting up your website on Github Pages.
Author
Jayesh Patel
Jayesh Patel is a Professional Web Developer & Designer and the Founder of InCreativeWeb.
As a highly Creative Web/Graphic/UI Designer - Front End / PHP / WordPress / Shopify Developer, with 14+ years of experience, he also provide complete solution from SEO to Digital Marketing. The passion he has for his work, his dedication, and ability to make quick, decisive decisions set him apart from the rest.
His first priority is to create a website with Complete SEO + Speed Up + WordPress Security Code of standards.